Print Receipts — Castle S4
Card Present › Castle S4 › Print Receipts
Receipt contents, how to reprint, and how to load a new paper roll
Automatic Receipts
By default, the terminal offers a receipt option after every transaction. The customer can choose to receive a receipt (printed), or to skip it. Two copies can be printed: one for the customer and one for your records.
What's on the Receipt
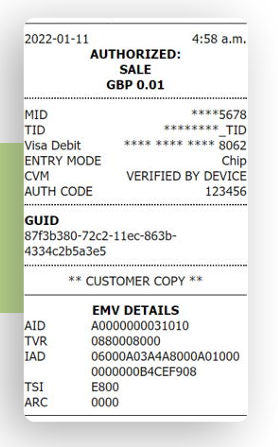
| Field | Meaning |
|---|---|
| Merchant name | Your registered business trading name |
| Terminal ID | Your unique terminal reference number |
| Date / Time | Transaction timestamp (DD/MM/YYYY HH:MM) |
| Transaction type | Purchase / Refund / Pre-Auth / MOTO |
| Amount | Total charged in your account currency |
| Gratuity (if applicable) | Tip amount added, shown separately |
| Card brand | Visa / Mastercard / American Express |
| Card number | Masked — last 4 digits only: **** **** **** 4242 |
| Entry mode | Contactless / Chip / Swipe / Keyed |
| Auth code | Network authorisation reference — retain for disputes |
| Result | APPROVED or DECLINED |
Reprinting a Receipt
- 1Tap the menu icon. Go to Transaction History. Find the transaction.Transaction record displayed.
- 2Tap Print Receipt.Receipt reprints immediately.
Loading a New Paper Roll
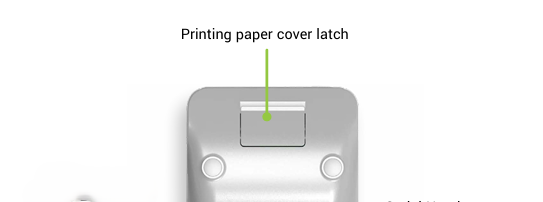
- 1Locate the printer cover release. Press the release button or lever to open the printer cover.Cover pops open.
- 2Remove any empty core or remaining paper.Printer slot clear.
- 3Take the new 57mm thermal roll. Identify the print side: smooth/slightly glossy = print side.Print side identified.
- 4Insert roll with the paper feeding from the bottom of the roll, up and forward through the paper exit slot. The glossy side must face toward the front of the terminal (toward the print head).Paper feeds through correctly.
- 5Pull out ~3cm of paper and close the cover firmly until it clicks. Tear off excess paper.Cover secure. Printer ready.
- 6Print a test receipt to confirm printing works correctly.Receipt prints with correct text (not blank).
Only use 57mm thermal paper. Using the wrong paper type produces blank receipts and can damage the print head. Never use glossy photo paper, inkjet paper, or coloured paper.