Payments & Transfers
Click Payments & transfers in the navigation bar. Six tabs run across the top of the page: History Templates UK Local International Drafts Direct Debits
1. Payment History
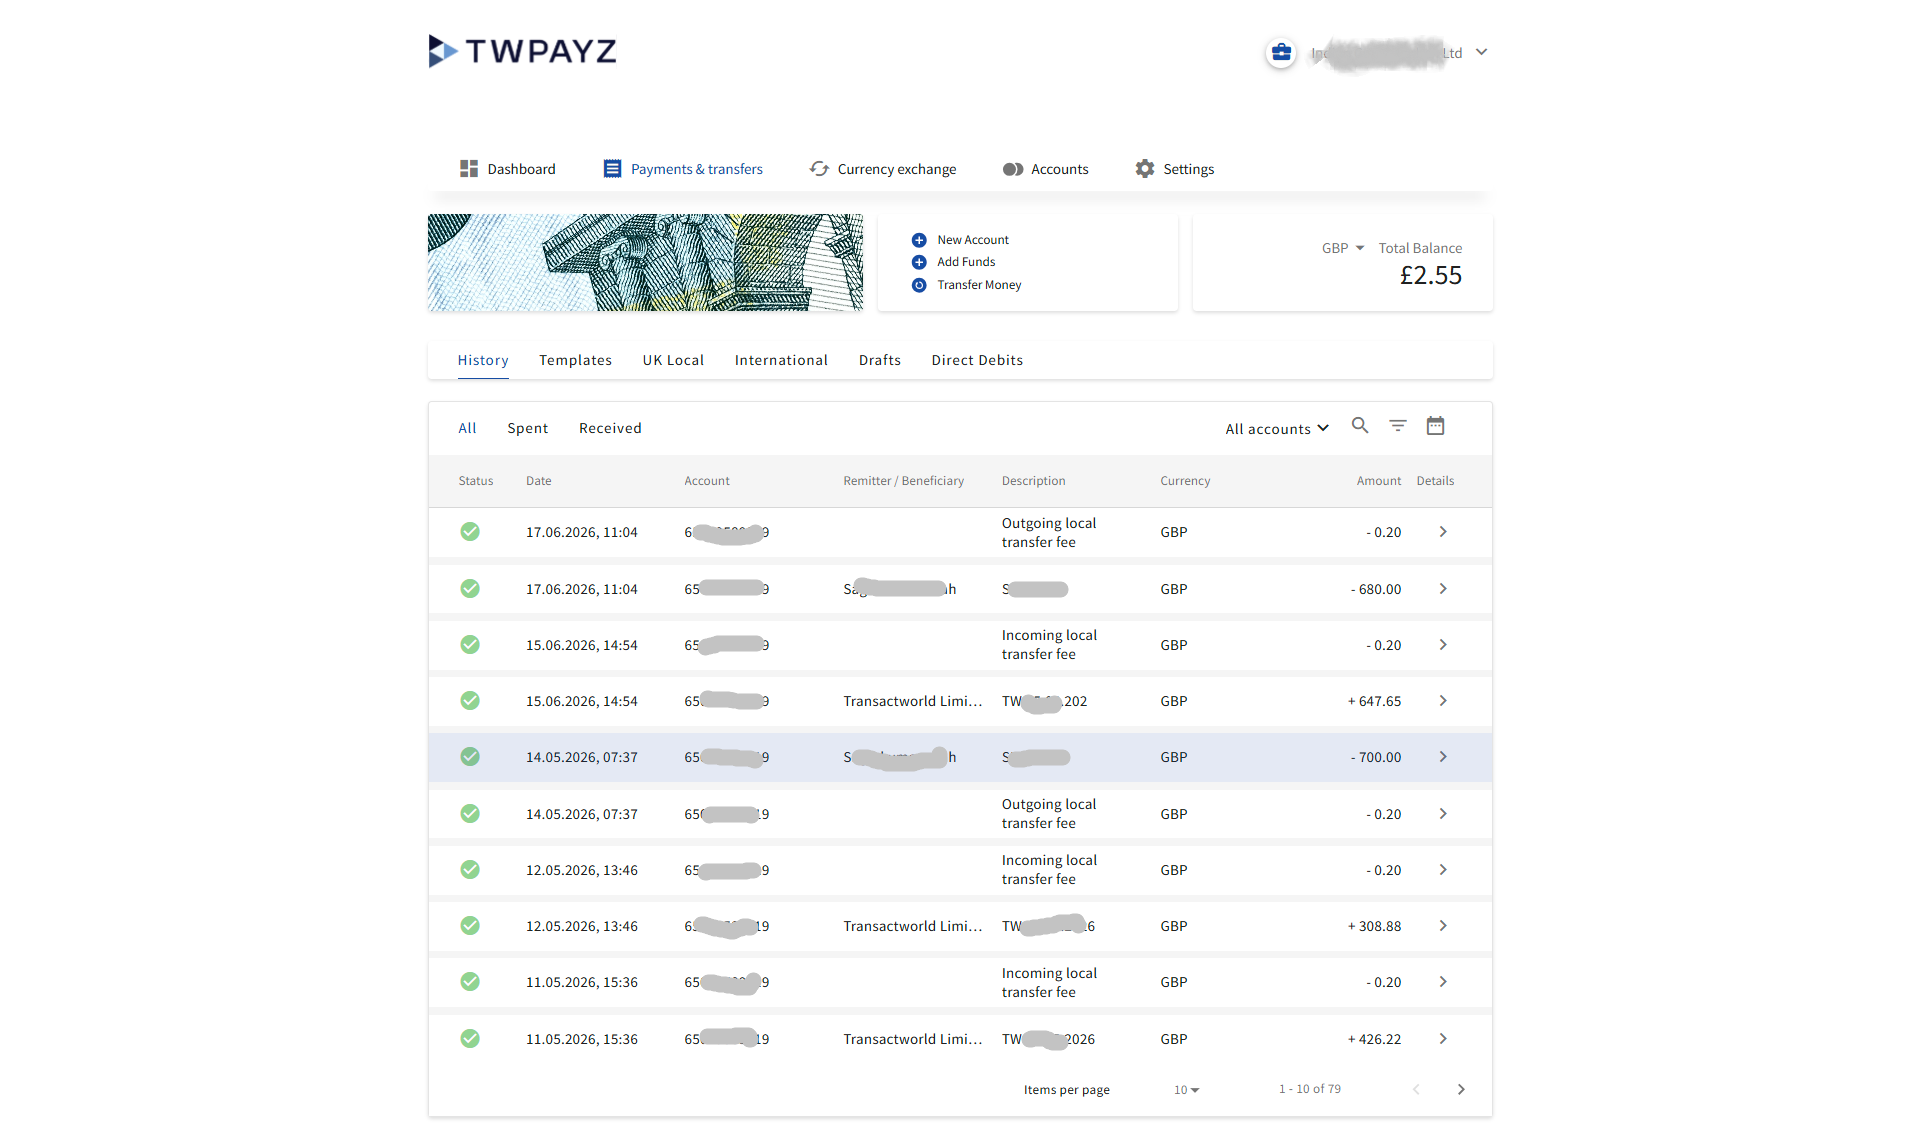
The History tab is a complete chronological log of every transaction on your account — both incoming and outgoing.
Column Guide
| Column | What it shows |
|---|---|
| Status | A coloured icon indicating the outcome of the transaction. A green tick means the payment has been processed and funds have moved successfully. A grey or amber icon indicates a pending or processing state. Contact support if a payment remains pending for more than one working day. |
| Date | The date and time the transaction was processed, shown as DD.MM.YYYY, HH:MM. Times are in UK time. |
| Account | The account number associated with this transaction — showing which of your accounts was debited or credited. |
| Remitter / Beneficiary | The name of the sender (for incoming payments) or recipient (for outgoing payments). This field may be blank for fee deductions and system entries. |
| Description | The payment reference or note. Incoming settlements from TWPayz start with TW followed by the date. For your own outgoing payments, this shows the description or reference you entered when making the payment. |
| Currency | The currency in which the transaction was made (e.g. GBP, EUR, USD). |
| Amount | The transaction value. Outgoing payments and fees are shown with a minus sign (–) in red. Incoming payments are shown with a plus sign (+) in green. |
| Details › | Click the arrow at the right end of any row to open the full transaction detail panel for that entry. |
Filter and Search Tools
| Control | How to use it |
|---|---|
| All / Spent / Received | These tabs at the top of the table filter by transaction direction. All shows everything. Spent shows only outgoing payments and fees. Received shows only incoming payments. |
| All accounts | If you hold more than one account, use this dropdown to restrict the history view to a specific account. |
| Search (magnifier icon) | Click to open the search bar. Type a payee name, payment reference, or description to find matching transactions. |
| Filter (lines icon) | Opens an advanced filter panel. Filter by date range, transaction type, or account to narrow down results. |
| Calendar icon | Opens a date picker to jump directly to transactions on a specific date. |
Transaction Detail Panel
Clicking the arrow (›) on any row opens a detail panel on the right side of the screen (or a full-screen view on mobile). This shows extended information including:
- Full sender or recipient name and account details
- Transaction or reference ID
- Value date — the date the funds were actually settled
- Any fee amount deducted from this transaction
- Bank or network reference number
Pagination
Use the Items per page dropdown at the bottom right of the table to show 10, 25, or 50 transactions per page. The counter on the right (e.g. 1–10 of 79) shows your position in the full list. Use the left and right arrows to move between pages.
2. UK Local Transfer
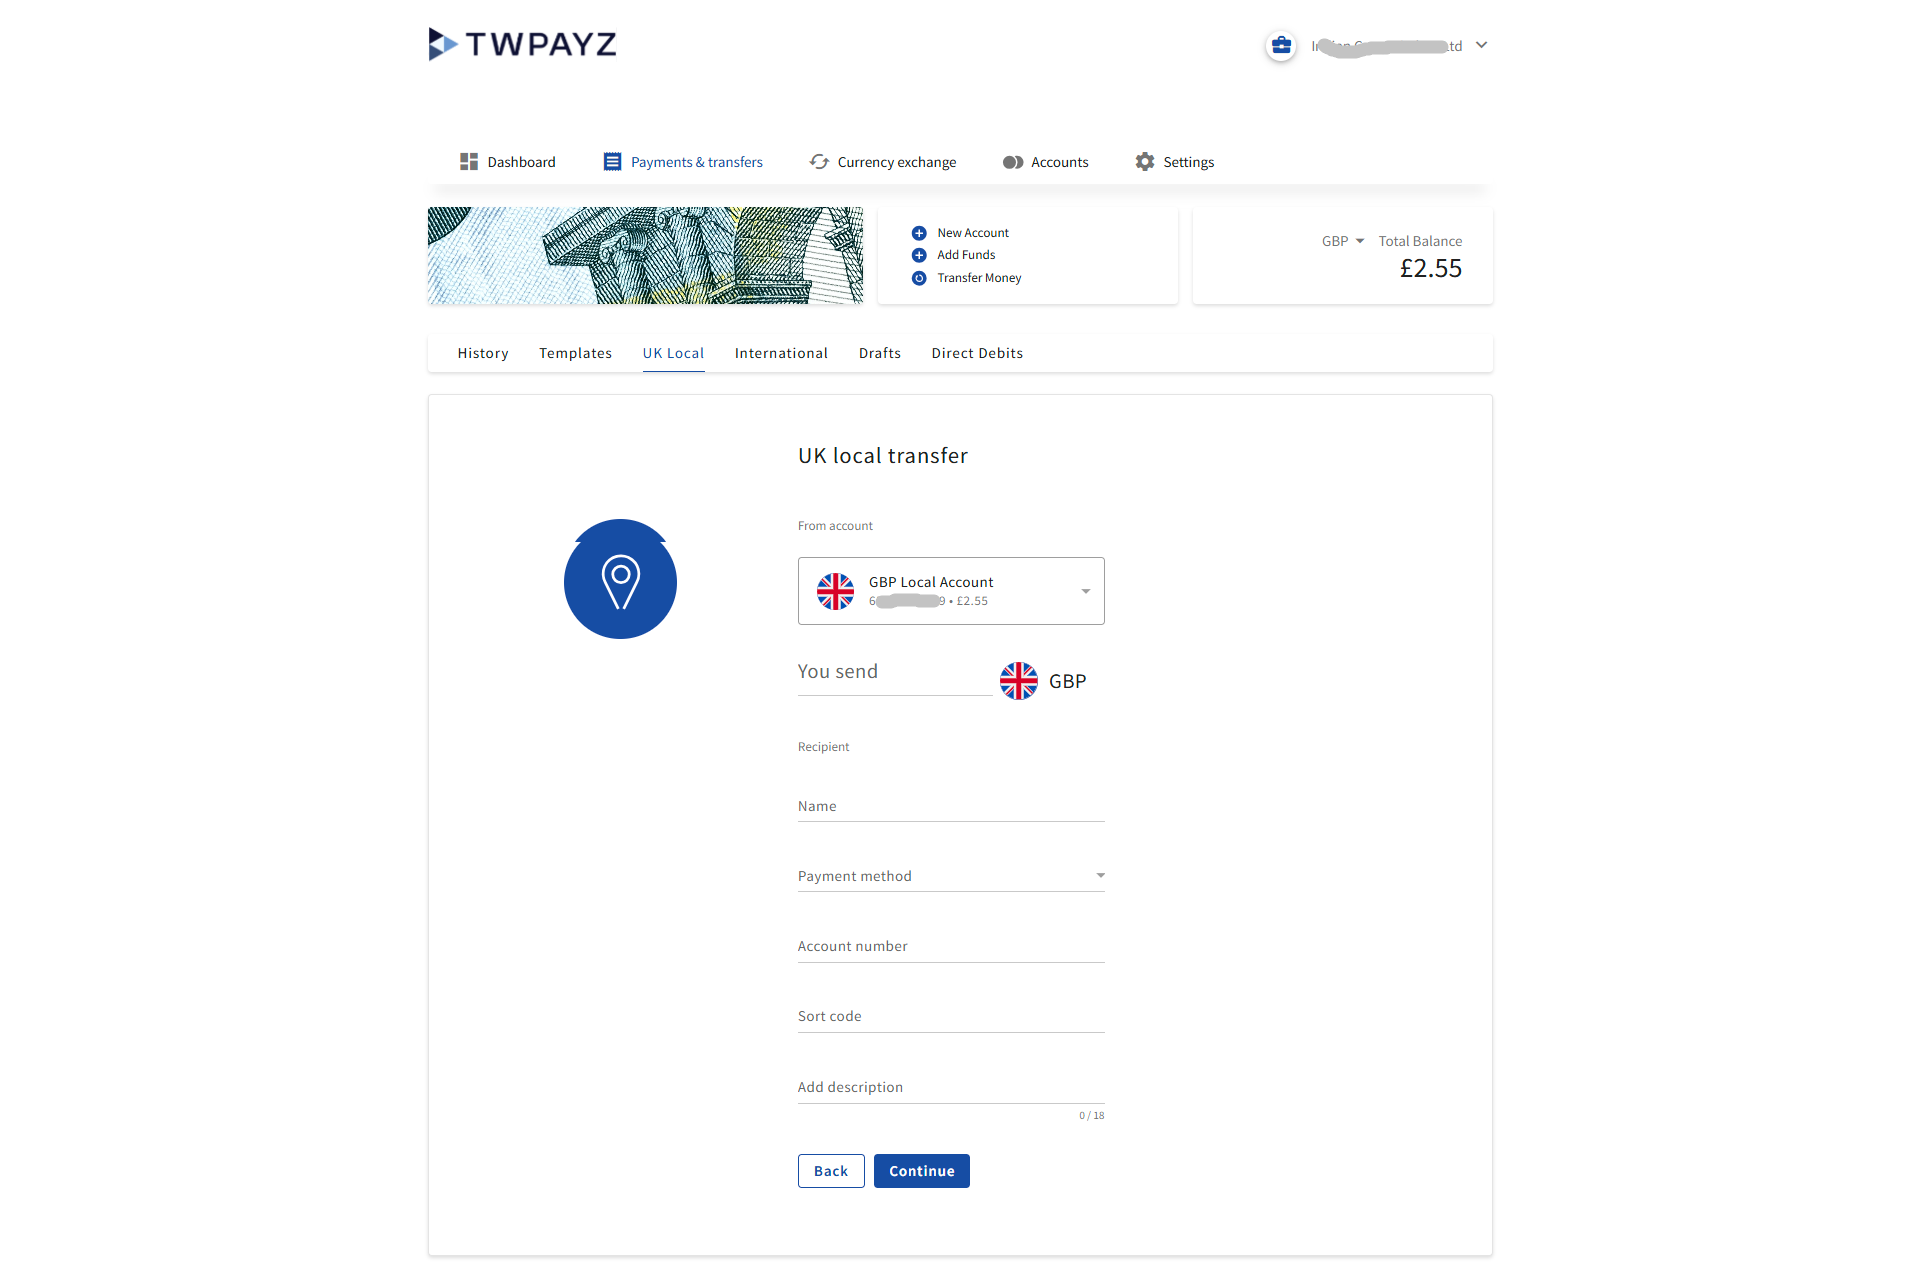
Use the UK Local tab to send a payment to any UK bank account using the Faster Payments or BACS network.
Form Fields — Step by Step
| Field | What to enter |
|---|---|
| From account | Select the account you want to send from using the dropdown. If you only hold one GBP account, it will be pre-selected. The current balance is shown beneath the account name. |
| You send | Enter the amount to send in GBP. The minimum amount is £0.01. The field only accepts numbers — do not include the £ symbol or commas. |
| Name | The full name of the person or business you are paying. Enter the name exactly as it appears on their bank account to ensure the payment matches correctly. |
| Payment method | Select the payment network from the dropdown: Faster Payments — arrives at the recipient's account within minutes (most domestic transfers). Maximum single payment: £1,000,000. BACS — takes 3 working days. Used for payroll, supplier payments, and large batch transfers where same-day arrival is not required. |
| Account number | The recipient's 8-digit UK bank account number. If their number has fewer than 8 digits, add leading zeros (e.g. 1234567 becomes 01234567). |
| Sort code | The recipient's 6-digit sort code, identifying their bank branch. Enter it with or without hyphens (e.g. 20-00-00 or 200000). |
| Add description | A short reference that will appear on the recipient's bank statement as well as your own transaction history. Maximum 18 characters. Use something meaningful such as an invoice number, your name, or a project reference. |
Completing and Confirming the Payment
- 1Fill in all fields and click Continue.
- 2A review screen displays all the payment details you have entered. Read every field carefully. This is your last opportunity to correct any mistakes before funds are sent.
- 3If all details are correct, click Confirm. If anything needs changing, click Back.
- 4A success screen confirms the payment has been submitted. Faster Payments typically arrive within a few minutes. The transaction will appear in your History tab.
3. International Transfer
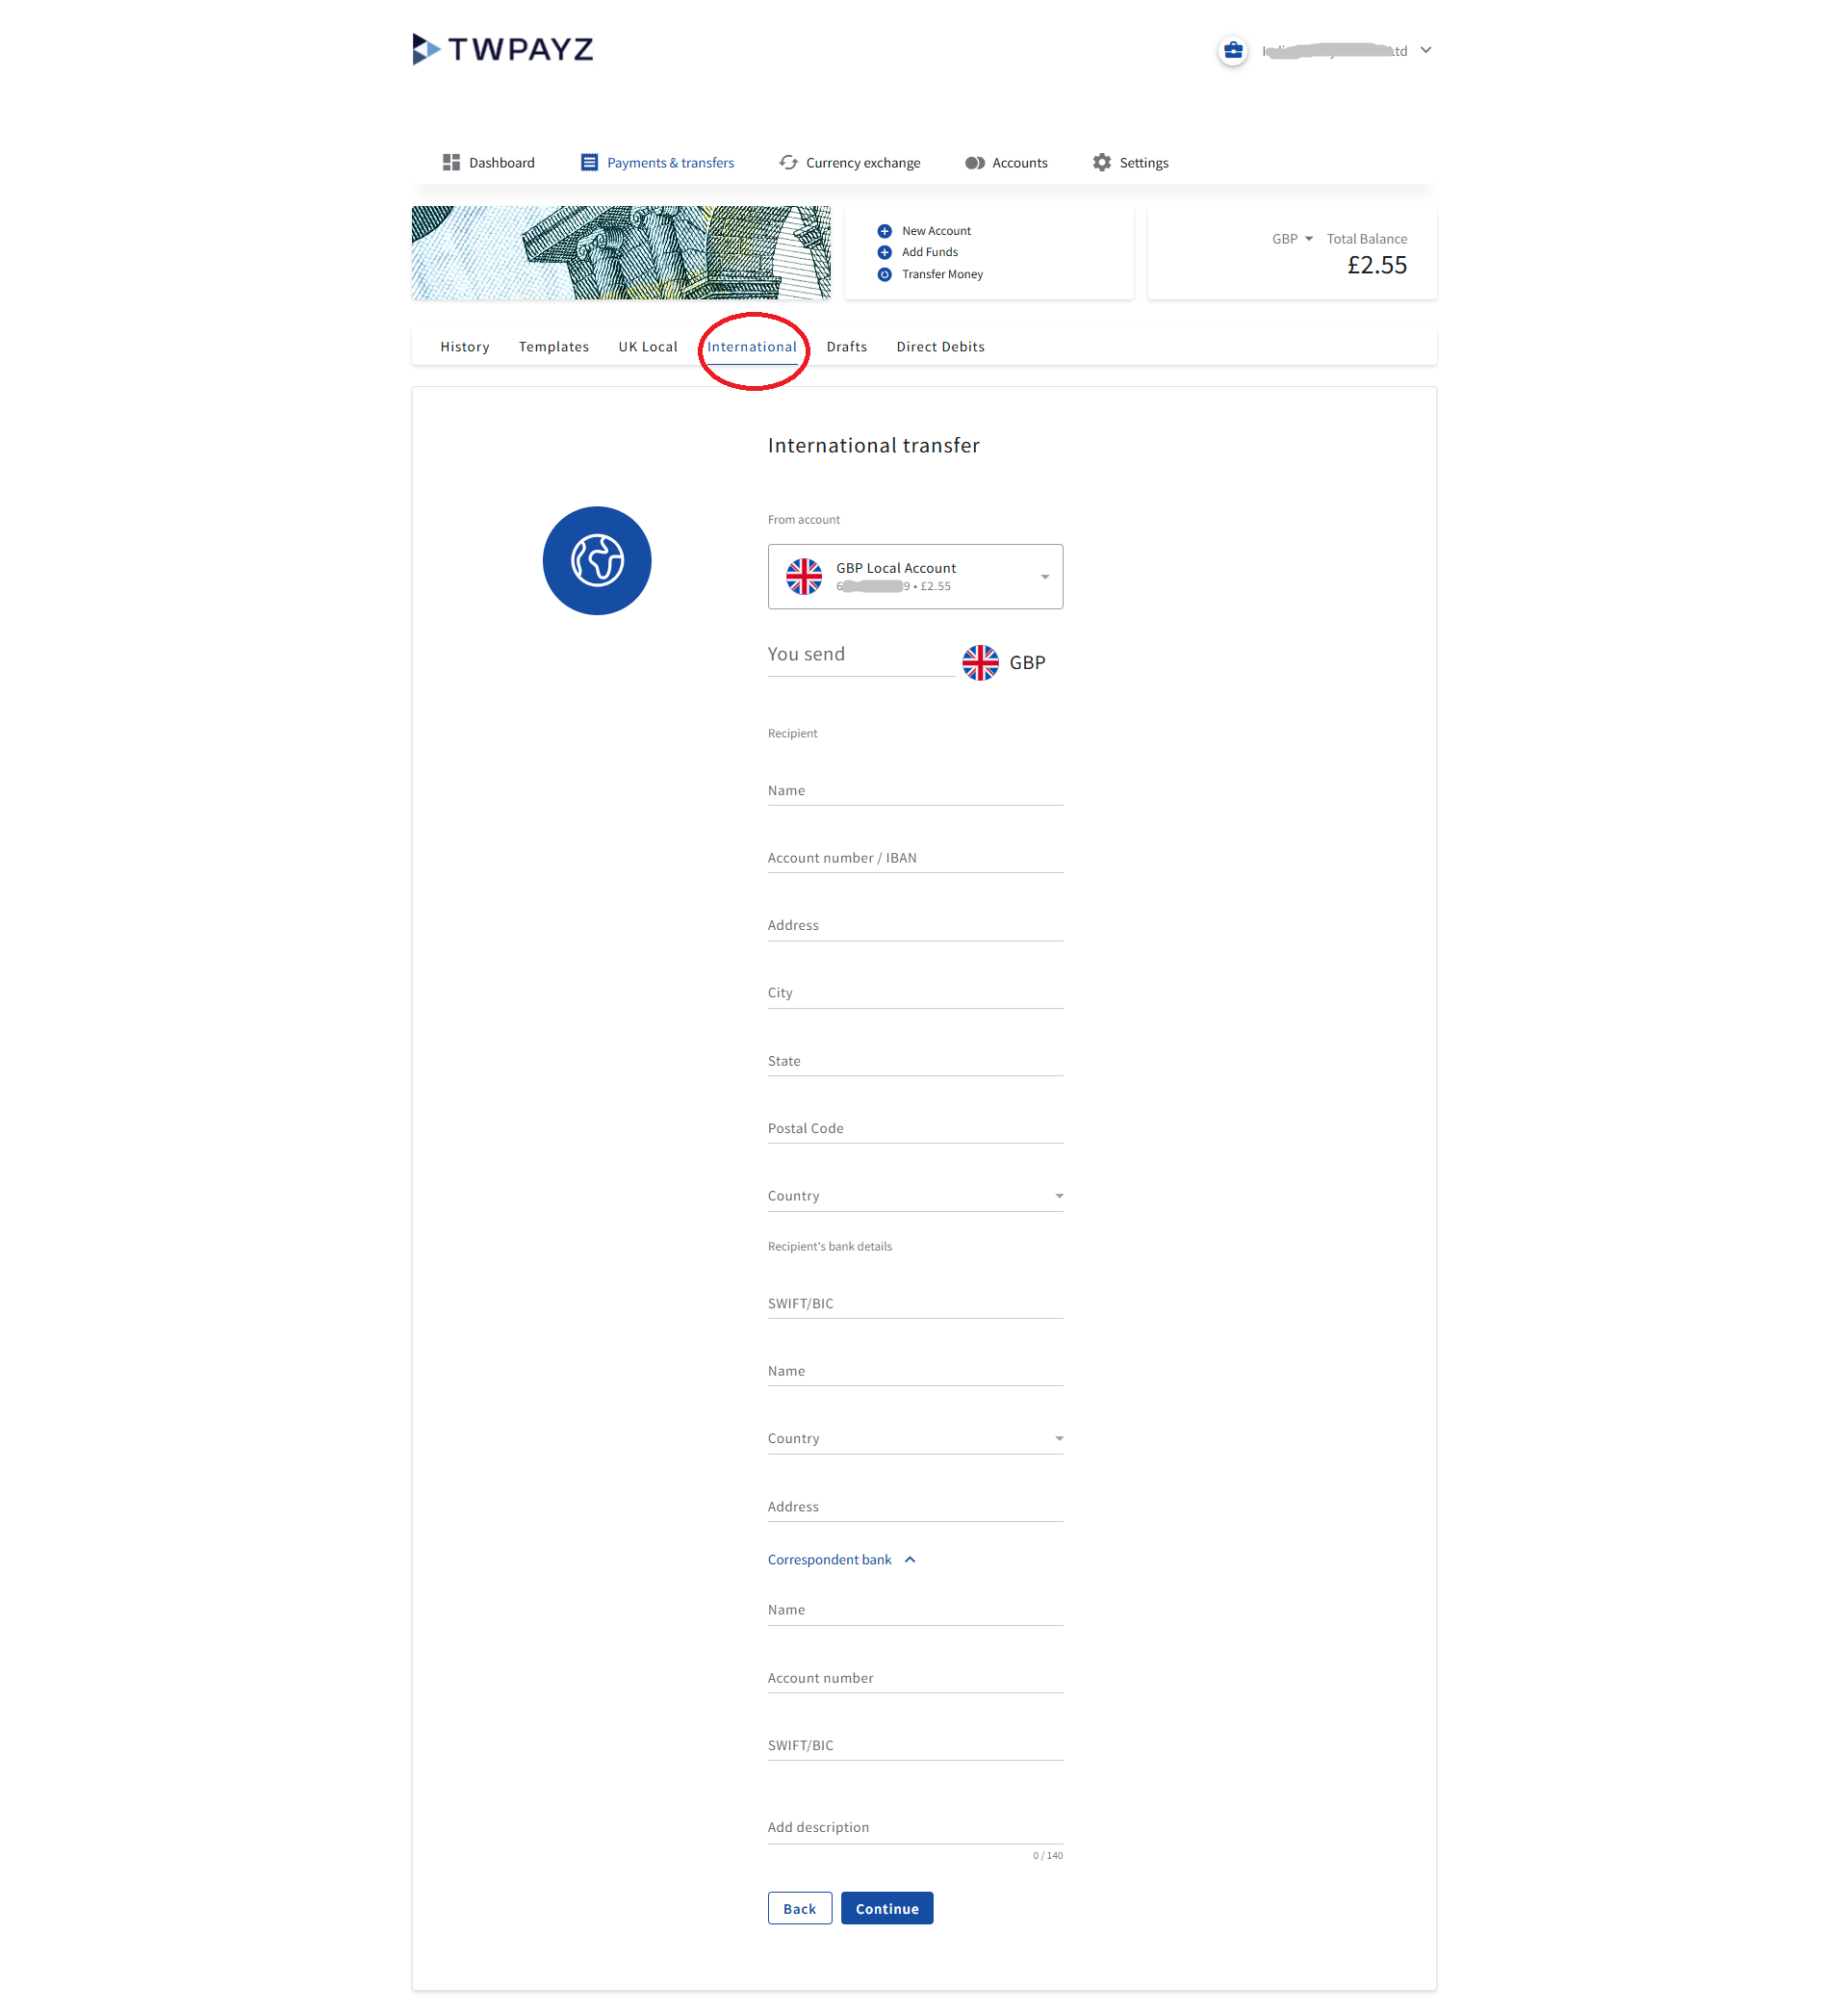
Use the International tab to send a payment to a bank account outside the UK. International transfers require more information than UK local payments.
Sender Information
| Field | What to enter |
|---|---|
| From account | Select the account to send from. You can send international payments from any currency account you hold, not just GBP. |
| You send | Enter the amount to send. The currency of the selected account will be used as the send currency. |
Recipient Details
| Field | What to enter |
|---|---|
| Name | The full legal name of the individual or company receiving the payment, as registered with their bank. |
| Account number / IBAN | For European and many international payments, enter the IBAN (International Bank Account Number). An IBAN starts with a 2-letter country code followed by up to 32 digits (e.g. DE89 3704 0044 0532 0130 00). For countries that do not use IBANs, enter the local bank account number. Ask the recipient which applies to them. |
| Address | The recipient's street address. This is required for all international transfers. |
| City | The recipient's city or town. |
| State | The recipient's state or province, if applicable. Leave blank if not relevant to the destination country. |
| Postal Code | The recipient's postal or ZIP code. |
| Country | Select the recipient's country from the dropdown list. |
Recipient's Bank Details
| Field | What to enter |
|---|---|
| SWIFT / BIC | The SWIFT code (also called a BIC — Bank Identifier Code) of the recipient's bank. This is an 8 or 11 character alphanumeric code (e.g. DEUTDEDB or BARCGB22XXX). The recipient or their bank can provide this. You can also find it on the recipient's bank statement or via the bank's website. |
| Name | The full name of the recipient's bank (e.g. Deutsche Bank, Barclays). |
| Country | The country where the recipient's bank is registered. |
| Address | The address of the recipient's bank or branch. |
Correspondent Bank (Optional)
A correspondent bank is an intermediary bank used to route the payment when the recipient's bank does not have a direct relationship with TWPayz. Expand this section only if the recipient's bank or TWPayz support has specifically advised you to complete it.
| Field | What to enter |
|---|---|
| Name | Name of the intermediary (correspondent) bank. |
| Account number | Your account or routing number at the correspondent bank, if required. |
| SWIFT / BIC | SWIFT code of the correspondent bank. |
Description
Enter a payment reference or note (up to 140 characters). This appears on your own History record and on the recipient's bank statement. Use a clear reference such as an invoice number, contract number, or brief description of the purpose.
Completing the Payment
- 1Complete all fields and click Continue.
- 2Review all details carefully on the confirmation screen.
- 3Click Confirm to submit. International transfers typically arrive within 1–5 working days depending on the destination country and currency.
4. Templates
Templates save the payment details of a regular payee so you do not have to re-enter them each time. A template stores: recipient name, account number or IBAN, sort code or SWIFT/BIC, and payment method. Each time you use a template you enter the amount and description fresh.
Using an Existing Template
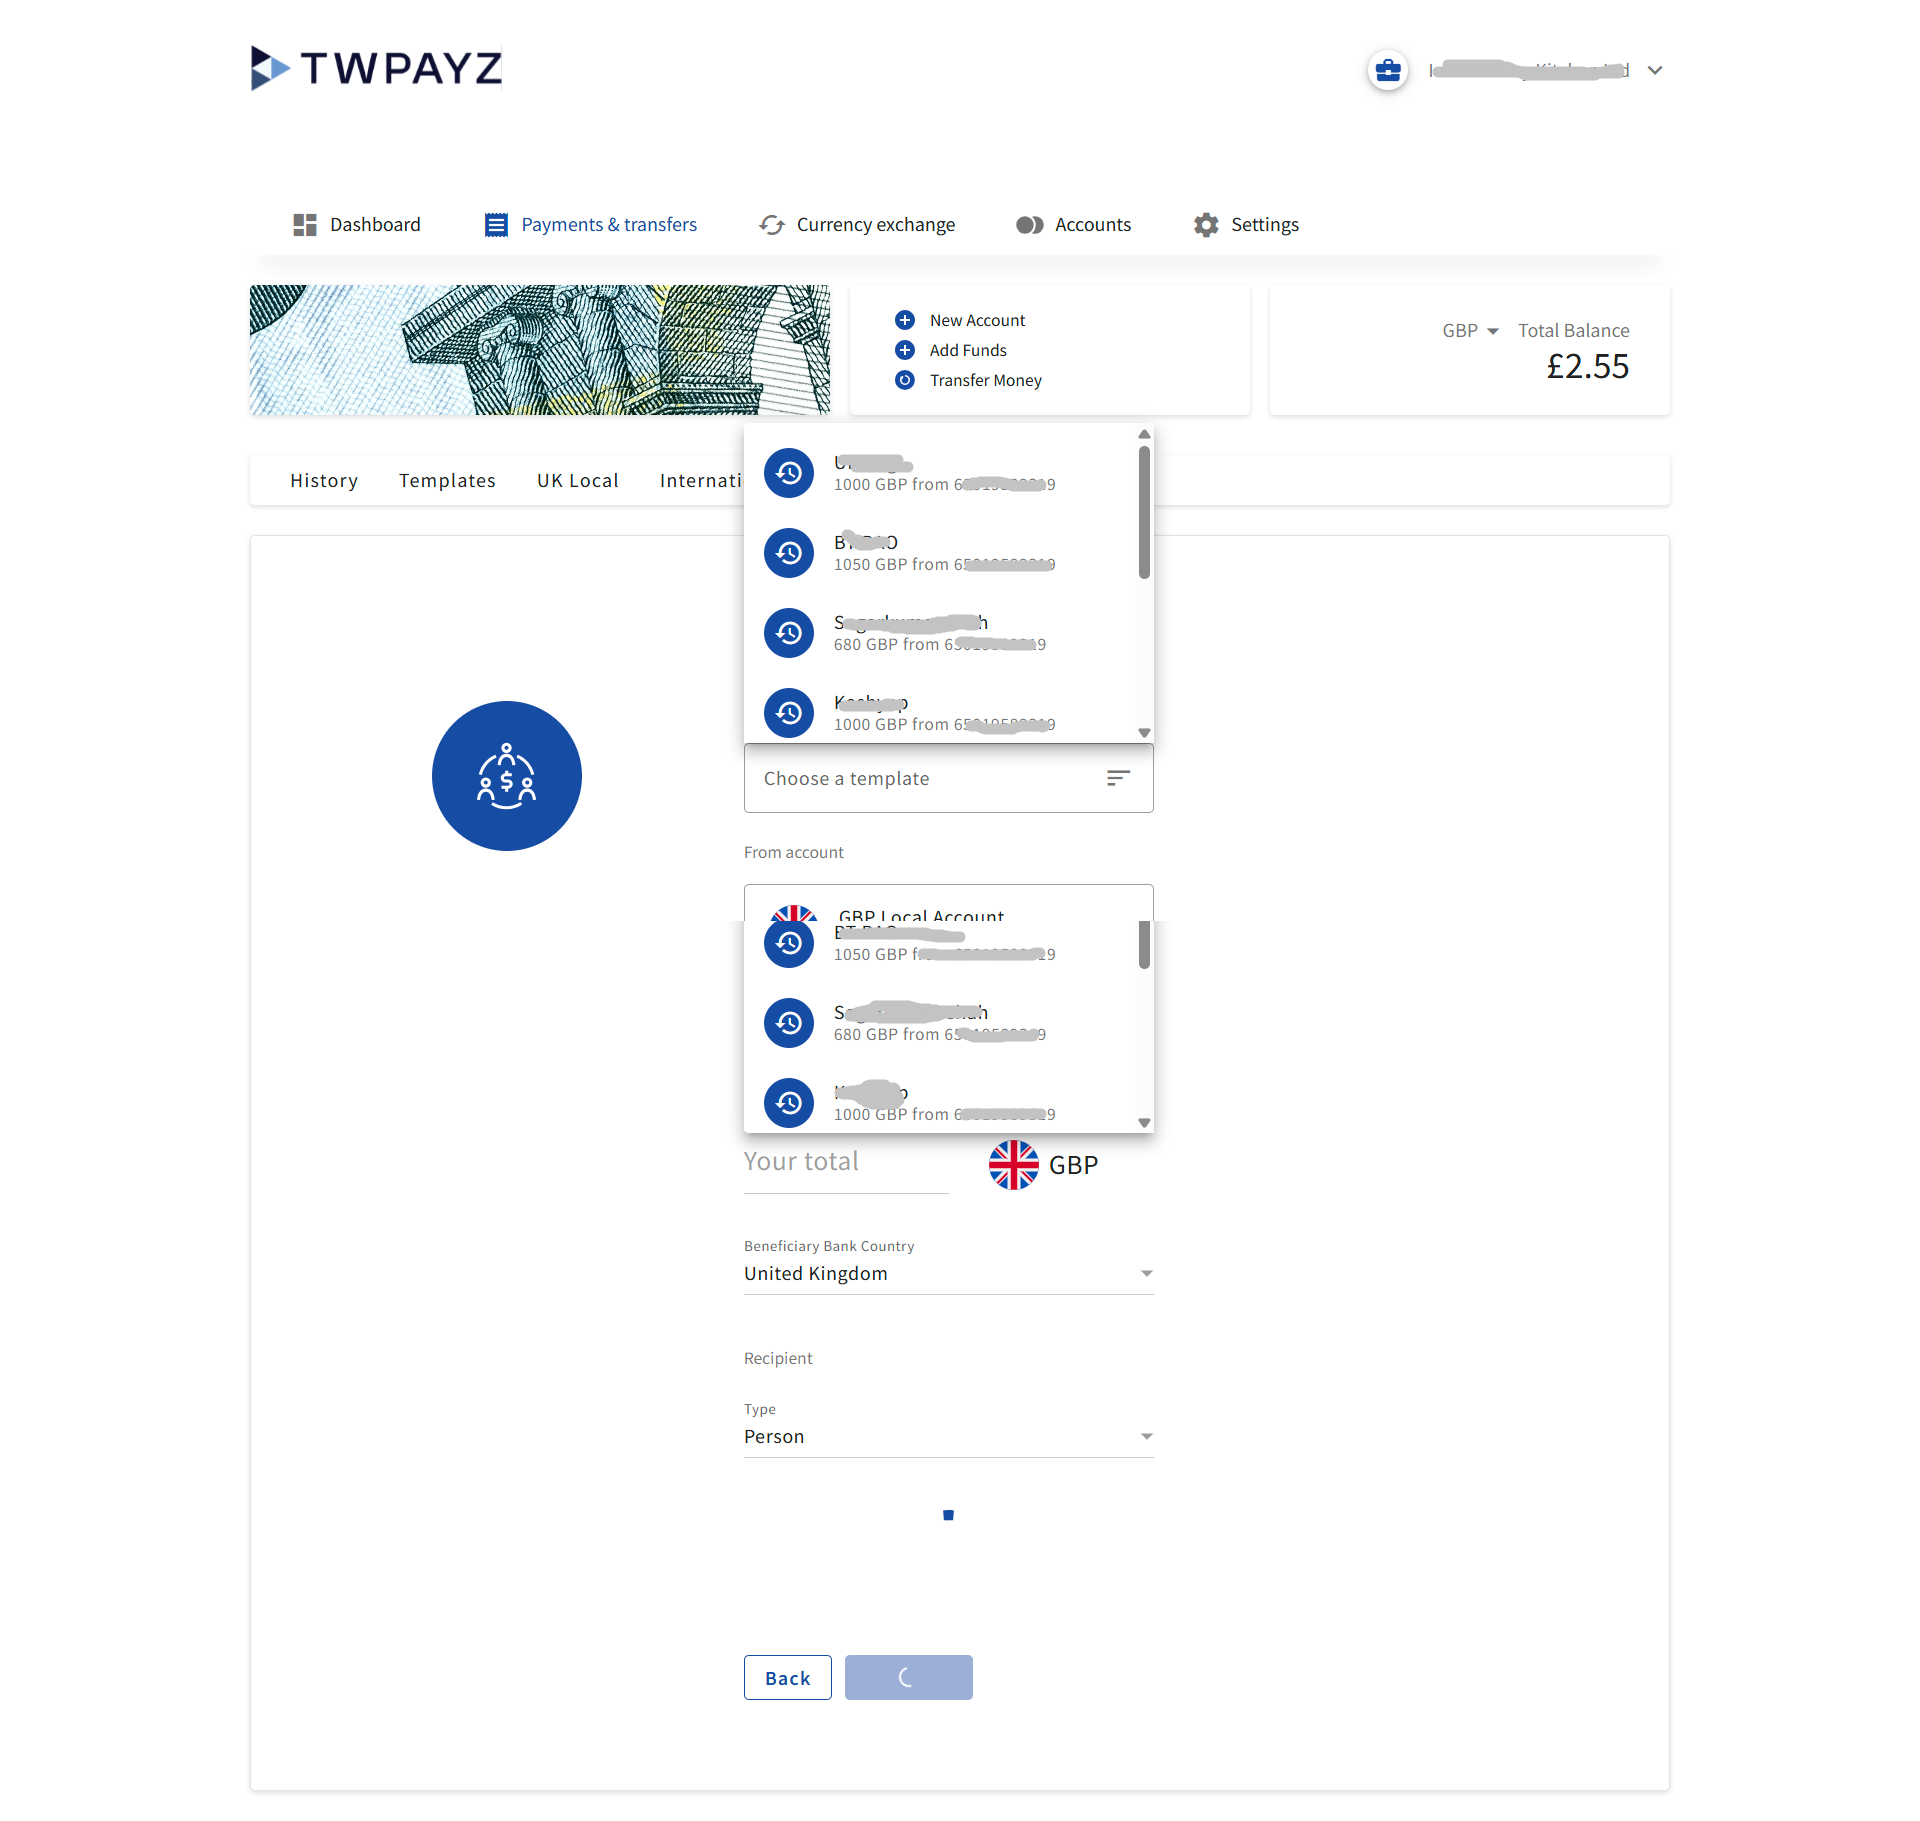
- 1Click the Templates tab. Your saved templates appear as a scrollable list at the top of the screen, each showing the payee name and the amount from the last transfer to that payee.
- 2Click a template card to select it, or use the Choose a template dropdown below the list.
- 3The saved payee details populate the form automatically.
- 4Enter the amount for this specific transfer and, if needed, a description.
- 5Select Beneficiary Bank Country and Recipient Type (Person or Business) if prompted, then click Continue.
- 6Review the details on the confirmation screen and click Confirm.
Saving a New Template
- 1Begin a UK Local or International payment as normal, completing all recipient fields.
- 2On the review screen, look for the option to Save as template or a checkbox labelled accordingly.
- 3Enter a clear, recognisable name for the template (e.g. "Monthly Office Rent" or "John Smith Invoice").
- 4Complete and confirm the payment. The template is saved and will appear in the Templates list for all future payments.
Managing Templates
To edit or delete a template, navigate to the Templates tab, select the template, and use the available edit or delete options. Deleting a template does not affect any payments already made using it — it only removes the saved details for future use.
5. Drafts
If you begin a payment but do not complete it (for example, you close the browser or navigate away), the details you have entered are automatically saved as a draft. You can return to a draft at any time to review and complete the payment.
Resuming a Draft
- 1Click the Drafts tab in Payments & transfers.
- 2Find the draft in the list. Each entry shows the payee, amount, and the date the draft was created.
- 3Click the draft, then click Continue to return to the payment form with all saved details pre-filled.
- 4Review and update any fields as needed, then complete and confirm the payment as normal.
Deleting a Draft
Select the draft and click Delete. This permanently removes the draft. It cannot be recovered. No payment is made when a draft is deleted.
6. Direct Debits
The Direct Debits tab lists all direct debit mandates currently active on your account. A mandate is a formal permission you have granted to a third party to collect regular payments from your account.
Understanding the Mandate List
| Column | What it shows |
|---|---|
| Company | The name of the organisation authorised to collect from your account. |
| Reference | The mandate reference number, as assigned by the collecting company. |
| Status | Active (collections are ongoing) or Cancelled (no further collections will be taken). |
| Last collection | The date and amount of the most recent collection under this mandate. |
| Next collection | The scheduled date of the next collection, if known. |
Cancelling a Mandate
- 1Click on the mandate row to open it.
- 2Select Cancel mandate.
- 3Confirm the cancellation. The mandate status changes to Cancelled immediately and no further collections will be taken.